Saturday, August 31, 2013

FAST Healthy Flat Bread Pizza

Flat bread pizzas are easy and fun to make, so be sure to include your kids in their creation! 

The first time I tried making homemade pizza was when stores started carrying those bagged lumps of low fat dough - but rolling that stuff out was crazy hard. The dough stuck to the rolling pin or stuck to the counter or insisted on shrinking, alien-like, back into a ball form, and no amount of flour, elbow grease and fake Italian curses helped. After two attempts at making them, my 'homemade pizza' phase ended. So when I saw it suggested that one could make pizza on plain old flat bread, I decided I had to try it.

Ingredients: 

1 Bag Whole Wheat or Multi-grain Smart Thins type flat bread. 
1 Jar Pizza Sauce
1 Bag shredded Low Fat Mozzarella Cheese.    
1 pack Turkey Pepperoni

Preheat your oven to 425 degrees. 

To start, open up your Flat Breads and separate into halves. Make as many or few as you like, but if you're making the whole bag, be ready to use more than one baking pan. These guys like their space. 


 Many little 'pizza to be's'... 

Spread some Pizza Sauce onto each one evenly. A small jar of Pizza Sauce like this one perfectly covers one whole bag (two pans worth) of Smart Thins.  


Neatly cover each piece with some shredded Mozzarella. 


Dust with a pinch of Oregano if you like. Add the Turkey Pepperoni. (Or, feel free to chop up a red and green pepper and use that instead. Hell, you can stick anything you want on them, at this point. Mushrooms, onions, etc.) (No..you can't use bacon.) (I said NO.) 

Turkey Pepperoni can usually be found near your deli counter and also by the 'make it yourself' pizza stuff. The store brand is fine...Boar's Head was on sale. (Everything was on sale *boggles*) 


(You can sprinkle some Parmesan Cheese on top when they come out of the oven, but keep in mind that does add fat and calories to your healthy pizza. My husband adds it. I do not. Everyone is happy!) 

Stick both pans in the oven and bake at 425 for 15 minutes.


Pull them out and eat them! 
Unless you are a bottomless pit like my husband, three of these guys will stuff you, and they're half the fat and calories of a slice of frozen pizza. 

I'd love to see pictures of your kids making these things! Please feel free to email them to Theserialqueen@gmail.com and I'll feature them there!!

Thursday, August 1, 2013

Chili's Type Southwestern Eggrolls

You love them at Chili's...and you can make them at home!

So here's what you'll need:

  • 1 Skinless Boneless Chicken Breast, cooked and shredded. 
  • 2 tablespoons Minced Green Onion
  • 1/3 cup MexiCorn (You know the stuff!)
  • 1/4 cup Black Beans, rinsed and drained. 
  • 2 tablespoons chopped spinach. 
  • 2 tablespoons diced Jalapeno Peppers
  • 1/2 tablespoon parsley
  • 1/2 teaspoon ground cumin
  • 1/2 teaspoon chili powder
  • 1/3 teaspoon salt
  • 3/4 cup shredded Monterey Jack (or any shredded Taco cheese)
  • 5 (6 inch) flour Tortillas
  • Oil for Frying

Okay, I'm telling you ahead of time that you have to put these things in the freezer for four hours before you fry them. Don't plan on making this and then immediately eating them. Plan ahead! Four hours ahead. At least. I make double the recipe above when I make this, since you can freeze them and it seems silly to waste half a can of corn and beans.

For starters, we're gonna cook and shred some chicken. For you newbs, to cook chicken breast, simply rinse it off, wrap it in some foil, place it in a baking dish and stick it in the oven at 350 for 50 minutes. Then slice the crap out of it.


(Playing Dexter with Chicken)

Next, we're going to chop up some tasty green onions. Green onions are bought in the produce section of your story and they come in a nice, cheap little bundle that looks like this.


(This is a great recipe for people who like to play with knives!)

Heat a tablespoon of oil in a pan over medium heat and toss these green onions on in there. Cook /stir them for a few minutes until they are soft. Then add the chicken, corn, black beans, spinach, jalapeno peppers, parsley, cumin, chili powder and salt. (aka 'everything else') Cook and stir 5 minutes until well blended and tender.
(Starting to look very Southwesterny!)

Remove from heat and stir in the Monterey Jack cheese until it melts. I used some generic 'Taco Cheese' because that's what Kroger carries and I was too lazy to go anywhere else. Honestly, as long as the words "Monterey Jack" are somewhere on the package, you're good to go! 
  
The Cheeese...eet eeez melting!

Wrap your tortillas in a clean, lightly moist cloth and stick them in the microwave on high for 1 minute, or until hot and pliable. (There can't be more than like 10 people in the world who don't exclusively use 'high" on their microwave. I'll bet 95% of you don't even know how to change that setting.) 

Tortillas...in a microwave.
(This picture wasn't really necessary, but look how clean the inside of my microwave is!) 

Put about two spoonfuls of mixture onto each tortilla. Like so:


To make your eggroll, fold in the sides of the tortilla in, fold the top over the filling and squeeze it gently a second. The tortilla is soft, it will conform to the shape of your filling. Then tuck the sides in again just a bit and roll it all the way. Squeeze it gently again. It's a bit like play-doh. You'll feel it mold. (Secure with toothpicks if you feel you need to) Put the eggrolls in a baking dish, cover it with plastic, and stick it in the freezer for at least four hours. (This is so they don't fall apart when you fry them.) 


Okay..now it's time to fry these suckers. The key to frying these in a pan is this: You don't want the heat so high that the outside gets too hard and brown before the inside cooks....so you want barely med high heat and watch your eggrolls carefully.  (Put them in carefully, don't splash hot oil on yourself!!!) (Start with the fold side down) Deep fry them for about ten minutes or until golden brown.


Drain on a paper towel before serving, and serve with a tasty ranch dressing!! :) 


Delicious! 


(*Bonus picture : My Noodles, helping me cook.)

Monday, July 29, 2013

Chicken Cordon Bleu for Newbs!


One of the things I love about doing a cooking blog is it forces you to try new and interesting recipes. Chicken Cordon Bleu is one of those things I always thought of as too hard to do, so I never even attempted it. Something about having to roll up ingredients with toothpicks...and hope it will A. Hold its shape and B. Cook all the way through...just seemed impossible given my limited skill set...but all of a sudden, today, I woke up and decided I was gonna try and make this.

*Derpy Edit -- I should probably give you a list of ingredients:

  •  6 Boneless Chicken Breast halves
  • 6 Slices of Boiled Ham
  • 6 Slices of Swiss Cheese
  • 3 Tablespoons Flour (pretty sure I used a lot more than that.)
  • 6 Tablespoons Butter
  • 1/2 Cup White Wine
  • 1 Tsp Chicken Bouillon Granules (go easy on this..)
  • 1 Tablespoon Cornstarch
  • 1 Cup Heavy Whipping Cream
For starters, preheat the oven to 350. Now, because Chicken Cordon Bleu needs nice thin slices of chicken, I decided to make a cooked, shredded chicken meal for tomorrow (Southwestern Egg Rolls, fyi,) thus allowing me the luxury of keeping that nice flat top piece while tossing those weird shaped under pieces into something else. Using a nice sharp knife (by the way, nice sharp knives DO matter...it took me a stupid long time to finally understand this.) slice your chicken in half like the illustration below..and just use those pretty top pieces. (Bottom pieces go into a foil hell all their own.)


Each thin slice of chicken now gets a slice of ham and a slice of swiss folded onto the top of it. I literally went to the deli and asked for SIX slices of Ham and SIX slices of Swiss Cheese, and the young woman behind the counter literally rolled her eyes at me. But why get more than you need?!


There are two methods to rolling these things up. The more common is to roll it up thin end to fat end long ways, and the other is to just fold it in half. Being a newb, I tried both ways to try both methods out. Once I rolled them, I secured that thing with a TON of toothpicks...because bitches love toothpicks. Meanwhile, I melt some butter (Did I say 'some?' How about six freaking artery clogging tablespoons worth?) in a pan over med-high heat. (Downs a handful of Simvastatin)


(Picture of butter melting in a pan...because Melted Butter!) 

Dredge the chicken pieces in flour, or...flour mixed with some seasoned bread crumbs. Some people dip them in egg first. I didn't do this..because after using SIX FREAKING ARTERY CLOGGING TABLESPOONS worth of butter, I am going to pretend to be health conscious. That...and this particular recipe didn't actually call for it.

(Dredging the chicken roll in flour)
(Is it me, or does this look pornographic?)

And then, why not just go ahead and toss that chicken on into that sea of butter. 


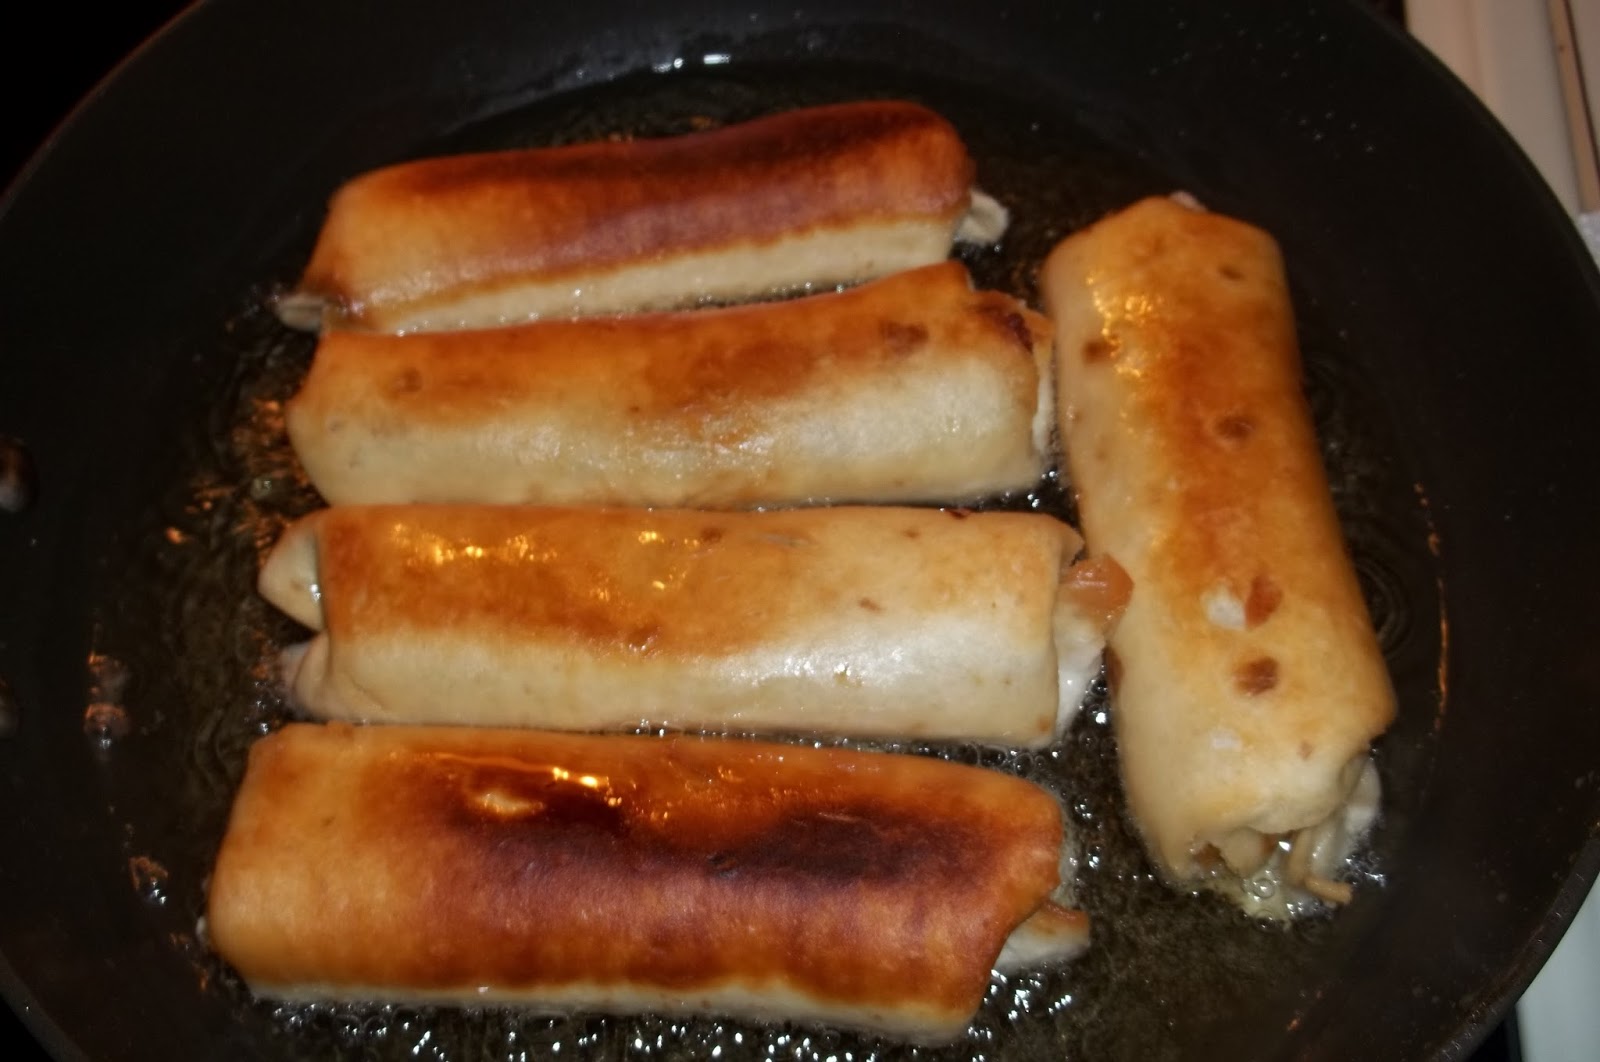
So the idea is to brown the chicken on all sides, and you would THINK that the cheese would fall out and it would get really messy, but this didn't actually happen. (Well, it did a little, but just a very teeny little.) You want to fry it long enough in the butter so that the sides get nice and brown. I started with the 'non open' sides down and then moved them around, which..requires a little creative work on your part since there are toothpicks fighting you the entire time. I used two forks to turn them...worked like a charm. 


(Chicken getting golden brown.)
(This is when my husband actually come downstairs to ask what I was cooking.)

Now that the chicken is brown, you put it in one of these things and stick it in the 350 oven for 25 minutes.


I'd like to point out, at this time, that the rolled chicken seems to be holding up better than the folded chicken, although in the end, they tasted exactly the same, so...take from that what you will. While this is cooking, we'll make the sauce. Now, I'll be honest...I didn't care for the sauce that came with this recipe. It came out too salty tasting to me. There are a few dozen different recipes for sauce for Chicken Cordon Bleu when I looked on the net, all with varying ingredients, and I'm sure one of them is delicious. But here is the sauce I didn't like...because I took pictures and well, you may as well learn from my mistake. 

You pour a half cup of white wine into the used pan (of butter goodness,) along with a teaspoon of chicken bouillon crystals. (I think the bouillon is what made it taste salty...so maybe try half a teaspoon first. Like, a real half teaspoon, leveled....) (I used one of those haphazard slightly heaping teaspoons...which may have been a bad idea.) Mix the cornstarch and whipping cream in a separate little bowl and then whisk that into the pan, lower the heat and let it simmer for ten minutes. It does thicken up nicely.


 (I...seriously messed up this sauce somehow...)

After twenty five minutes, I checked to make sure the chicken was cooked through nicely, which it was. And here's the finished product! 

(Why yes, that IS a LAKE of butter..but look at my beautiful CHEEEKEN!)

When I cut open the rolls, they were indeed perfect inside, much to my surprise, and they tasted AMAZING, as in a full ten on a scale from one to ten! The folded ones also tasted amazing, and while not as aesthetically pleasing, I found no real difference between the two. Even without my completely messed up sauce, these things were heavenly to eat and now that I've finally got my first Chicken Cordon Bleu under my belt, I plan to make them more often. Hopefully, with a much better sauce. :)